

What we're doing?
Install dependencies that we need to run the training
Prepare the data for a custom model
Train the model
Run a script to generate our custom subject, in this case the sweet, Gal Gadot
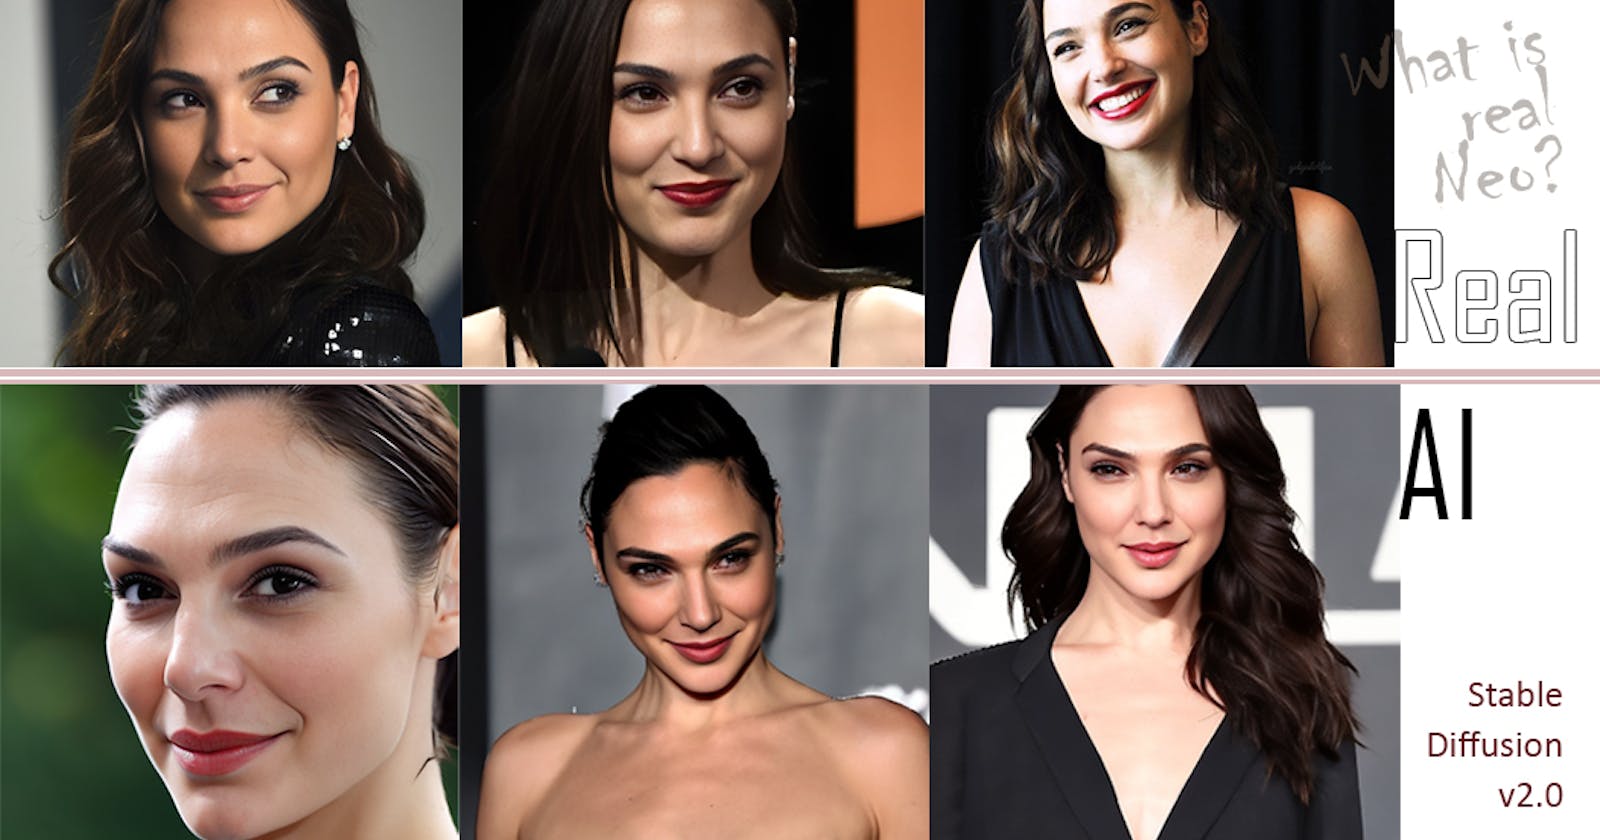
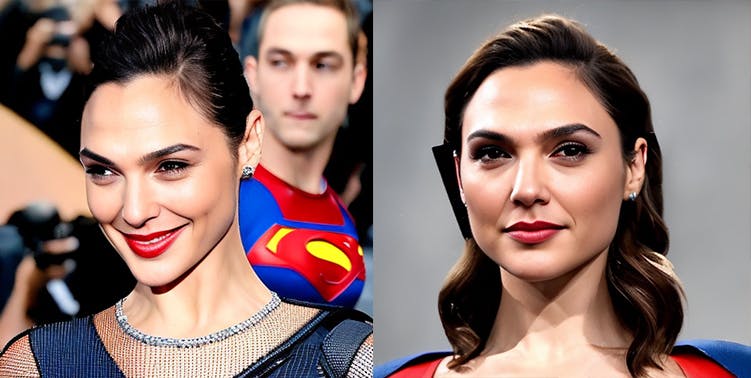
If all goes right you'll be generating AI images that look like this:
Update: As of 21-Dev-2022 - Automatic1111 support for training Dreambooth is pretty good:
You can train your model inside Dreambooth (both 512 and 768).
It supports converting the output of the diffuser to chkpt as well.
Nerdy rodent here, who has a nice video covering the Dreambooth flow
If you want to just quickly train a model and use the AutomaticGUI - you can use that.
If you want to set up a command-line way to train and do the inference, this is the right article for you.
As of right 27-Nov-2022, custom models of v2.0 seem to be breaking on Automatic1111 GUI (at least on my setup). So once we generate the model, we'll write a script to generate the images. Relax, breath, its easy, it'll take a while but we'll get there.
You can follow this guide if you have an ubuntu machine or server with sufficient GPU to be able to train the model. If not there is a google-colab notebook you can can try.
Lets get down to business
I see a lot a people have doubts about how to fine tune models - on SD v2.0. I've trained a couple of models with v2.0 so I think it's a good time to share the process.
**This is my setup: ** AWS server, Ubuntu 20.04.5, NVIDIA A10G - 24GB VRAM, 8 core CPU and 32GB RAM
My AWS AMI already has Pytorch pre-installed with conda, so I am assuming you have that installed already as well.
LFG Baby!
I'm doing everything in this directory /work, if you follow along you can copy-paste my commands. If you decide to change the directory to something else, make sure you change that as well.
# My local directory:
mkdir /work/

# Make a venv to put stuff in:
python3 -m venv /work/venv_diffusers_sd_2
Check, you should see a nice and shiny venv ready to go:ls -ltrh /work/venv_diffusers_sd_2

```bash
make the directory to git clone the diffusers code
mkdir /work/diffusers_sd_v2
cd /work/diffusers_sd_v2
Clone the much loved repo from Shivam!
the dot in the end tells git, don't make a new folder, clone right here
git clone github.com/ShivamShrirao/diffusers.git .
Activate the venv we just made:
source /work/venv_diffusers_sd_2/bin/activate
You should see this at the start of your command line now --> (venv_diffusers_sd_2)
pip install -qq git+https://github.com/ShivamShrirao/diffus.. pip install -q -U --pre triton pip install -q accelerate==0.12.0 transformers ftfy bitsandbytes gradio natsort pip install --upgrade git+https://github.com/huggingface/diffuser.. transformers accelerate scipy ```
ok, after those harry potter spells done, now we more to robots.
This step is to install xformers -- but, it's very specific to the GPU model -- if you are running Tesla T4 or P100 then this command will work for you: (if it's your local PC, most likely you aren't, because they aren't consumer cards)
# Only for Tesla T4 and P100:
pip install -q https://github.com/metrolobo/xformers_wheels/releases/download/1d31a3ac_various_6/xformers-0.0.14.dev0-cp37-cp37m-linux_x86_64.whl

# I have a A10G, so I built xformers from source
# this takes a good 30+ mins to compile
pip install git+https://github.com/facebookresearch/xformers@1d31a3a#egg=xformers
pip install torchvision
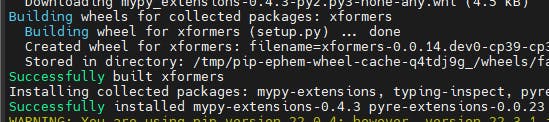
If you're building from source, it's going to take a while, good time to finish a bottle of soju and come back.

If your stars are in alignment then the xformers install that will finish successfully and show you some message like this:
Prepare your data: We need 2 sets of images to run the training:
Images of the person (or thing) you are trying to fine-tune on -- for our case let's call it images of our 'subject'
Regularization images to use while we run the model
Regularization images are used so that while you fine tune the model and teach the model what that new person is - eg. photo of {keyword} woman the model should still retain the general idea of what the class is (when the training is done, it should still know, what a woman is or what a person is -- this is done to preserve the quality of your generated model.
I like to use about 200 odd regularization images -- I found a nice flikr dataset -- but for our training' we need the images to be 512px x 512px -- So I separated the images by gender resized them to 512px x 512px
if you have your own regularization images, you can use those as well.
# Make the regularization images directory:
mkdir -p /work/regularization_images
cd /work/regularization_images

# Get the images
git clone https://github.com/dminGod/StableDiffusion-Regularization-Imgs.git .

# You should now have 3 folders:
ls -ltrh /work/regularization_images

-rw-r--r-- 1   ubuntu ubuntu  136  Nov 27 09:36  README.md
drwxr-xr-x 2 ubuntu ubuntu  20K  Nov 27 09:36  man
drwxr-xr-x 2 ubuntu ubuntu  4.0K Nov 27 09:36  woman
drwxr-xr-x 2 ubuntu ubuntu   4.0K Nov 27 09:56 example_celebs
the example_celebs has 1 folder for gal_gadot, so if you don't have any data prepared, you can just use that and follow along.
Okay, let's prepare the json file to start our training:
# Make a folder to put stuff related to this training:
mkdir /work/train_1/

# Create a blank file to define the training:
touch /work/train_1/concepts_list.json

# Create a folder where you will upload the subject images:
mkdir /work/train_1/subject_images/

# Folder where we will output the fine-tuned model:
mkdir /work/train_1/model_out/
Some tips on picking your images:
You should have about 25 images
Good mix of closeups and full body poses
Avoid pics that have too much jewelry or where the face isn't very clear otherwise it'll add jewelry to all image generations (if you want this, then ignore this).
Try to get images in different backgrounds and lighting conditions so it can 'understand' the subject and doesn't train on the environment.
Avoid having other people showing up in the images.
Quality is much more important than quantity -- fewer nice images are better than tons of bad images
All the subject images need to be of 512px X 512px -- Once you've got the images ready, you can use either Photoshop/another tool. I just use this website https://www.birme.net/ -- it has a nice interface to quickly to resize images.
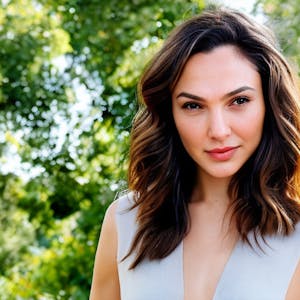
Ok, lets get down to business -- for this example I am using images of Gal Gadot.
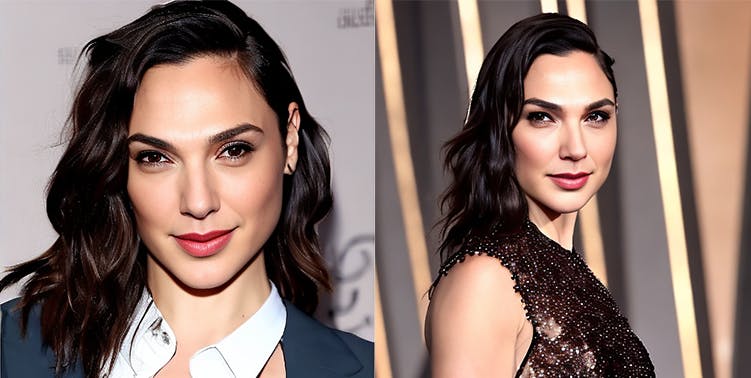
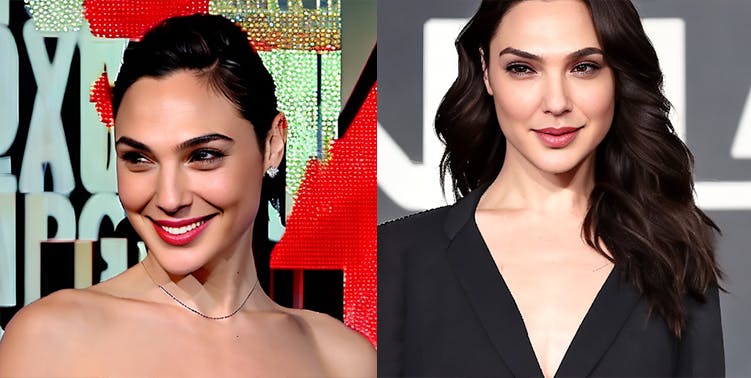
This is about what my samples look like -- 50 images:

Upload the images to the directory we have created for the images:mkdir /work/train_1/subject_images/
# Upload your subject images to this directory --> /work/train_1/subject_images/

# or

# If you want to use the images I am using (Gal Gadot), you can copy the regularization images into this folder:
# cp /work/regularization_images/example_celebs/gal_gadot/* /work/train_1/subject_images/
ok, now that we have the regularization images and the subject images in place -- lets make our job definition json.
Edit the blank file we had created earlier /work/train_1/concepts_list.json
[
    {
        "instance_prompt":      "photo of ggd woman",
        "class_prompt":         "photo of a woman",
        "instance_data_dir":    "/work/train_1/subject_images/",
        "class_data_dir":       "/work/regularization_images/woman/"
    }
]
If your subject is male, it would look like this:
[
    {
        "instance_prompt":      "photo of ggd man",
        "class_prompt":         "photo of a man",
        "instance_data_dir":    "/work/train_1/subject_images/",
        "class_data_dir":       "/work/regularization_images/man/"
    }
]
Note: I've suggested - man and woman here, but I've seen several people mention that using person gives them good results also -- sometimes 'man' and 'woman' will add very stero-typical features that are not present in the actual subject -- like it'll add a strong jaw-line to guys etc.. so play around with the man / woman / person thing. Also you'll need the regularization image-set if you use person.
instance_prompt - This is keyword that our model will recognize this character with -- here I have used ggd. You can use other short meaningless keywords like wqz, kzq or whatever suits your fancy -- just don't use normal words or you may see weird behavior.
class_prompt - This is just describing what type of subject we have.
instance_data_dir - Where the subject photos are found.
class_data_dir - Where the images of the class are found ( generic pics of man / woman / person )
Okay!
whew! with all of that done.. lets get to the meat and potatoes of the thing -- the actual training:
This is the actual command that we will use for our training:
accelerate launch train_dreambooth.py \
 --gradient_accumulation_steps=1 --pretrained_model_name_or_path="stabilityai/stable-diffusion-2-base" \
 --pretrained_vae_name_or_path "stabilityai/sd-vae-ft-mse" --output_dir=/work/train_1/model_out/ --with_prior_preservation \
 --prior_loss_weight=1.0 --resolution=512 --train_batch_size=1 --learning_rate=2e-6 \
 --lr_scheduler="constant" --lr_warmup_steps=0 --num_class_images=200 --max_train_steps=1200 \
 --concepts_list="/work/train_1/concepts_list.json" --train_text_encoder --revision="fp16" --mixed_precision="fp16"
I'm not going to delve into each of the params -- you can learn about and experiment with the different knobs like learning_rate and max_train_steps etc. --output_dir is where the model files will be generated. If this is the first time you are running this, it may ask you for your hugging face token.
Get your hugging face token:
To get this make an account on : huggingface.co
Go to the stable-diffusion website and agree to this models terms: huggingface.co/stabilityai/stable-diffusion-2
After this, click on your profile pic --> settings --> Access Tokens (left side menu) You will see a page where you can get your access token.
Lets start the training!
# Back to our old friend Shivam's repository:
cd /work/diffusers_sd_v2/examples/dreambooth

# Start the training:
accelerate launch train_dreambooth.py \
 --gradient_accumulation_steps=1 --pretrained_model_name_or_path="stabilityai/stable-diffusion-2-base" \
 --pretrained_vae_name_or_path "stabilityai/sd-vae-ft-mse" --output_dir=/work/train_1/model_out/ --with_prior_preservation \
 --prior_loss_weight=1.0 --resolution=512 --train_batch_size=1 --learning_rate=2e-6 \
 --lr_scheduler="constant" --lr_warmup_steps=0 --num_class_images=200 --max_train_steps=1000 \
 --concepts_list="/work/train_1/concepts_list.json" --train_text_encoder --revision="fp16" --mixed_precision="fp16"
If you've been good all year and god doesn't want to punish you, you will start to see stuff like this :

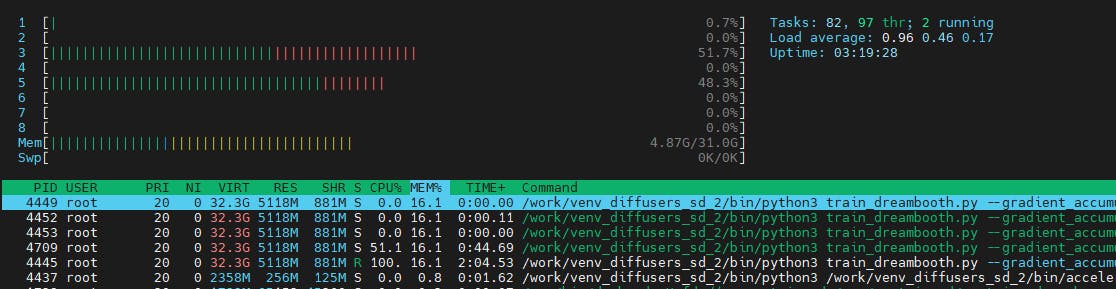
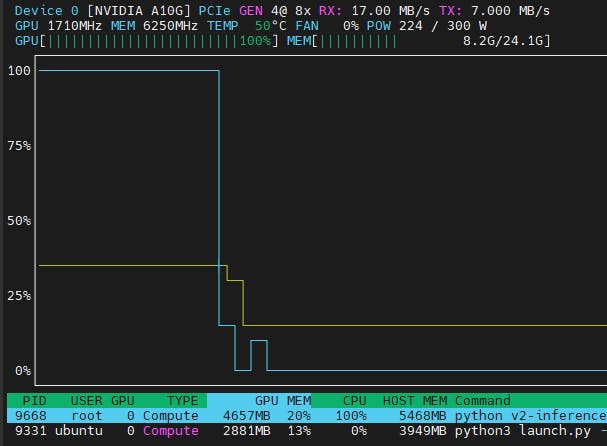
Monitoring the gpu using nvtop (install using apt-get install nvtop):

htop (install using apt-get install htop):
**Done! **

Find the path of your model, you'll need it in the next step to generate the images:
# findout the path of your model
# it will be created in the directory we passed it : /work/train_1/model_out/
ls -ltrh /work/train_1/model_out/

# In my case it was in : /work/train_1/model_out/1000
Create a python file: v2-inference.py
Change the img_out_folder, prompt and other params if you want:
import torch

from torch import autocast
from diffusers import StableDiffusionPipeline, DDIMScheduler
import random

# Change these as you want:
model_path = "/work/train_1/model_out/1000"
img_out_folder = "/work/stable-diffusion-webui/outputs/txt2img-images/"

# Image related config -- Change if you've used a different keyword:

# Try our original prompt and make sure it works okay:
# prompt = "closeup photo of ggd woman in the garden on a bright sunny day"
prompt = "photo of ggd"
negative_prompt = ""
num_samples = 4
guidance_scale = 8.5
num_inference_steps = 80
height = 512
width = 512

# Setup the scheduler and pipeline
scheduler = DDIMScheduler(beta_start=0.00085, beta_end=0.012, beta_schedule="scaled_linear", clip_sample=False, set_alpha_to_one=False)
pipe = StableDiffusionPipeline.from_pretrained(model_path, scheduler=scheduler, safety_checker=None, torch_dtype=torch.float16, revision="fp16").to("cuda")


# Generate the images:
images = pipe(
        prompt,
        height=height,
        width=width,
        negative_prompt=negative_prompt,
        num_images_per_prompt=num_samples,
        num_inference_steps=num_inference_steps,
        guidance_scale=guidance_scale,
    ).images

# Loop on the images and save them:
for img in images:
    i = random.randint(0, 200)
    img.save(f"{img_out_folder}/v2_{i}.png")
Run the file:python v2-inference.py
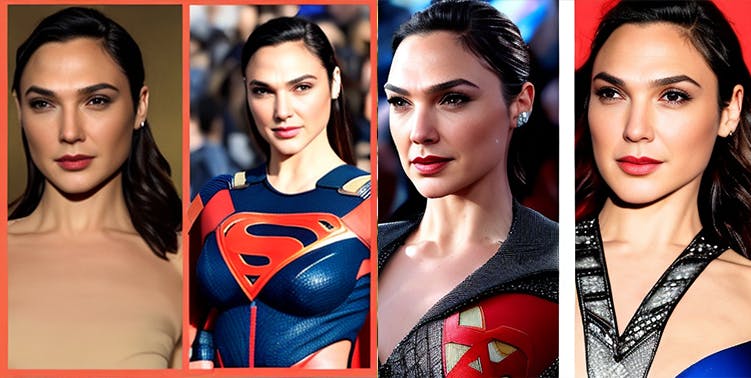
**Beauty: 😍😍🤩 **
photo of ggd

closeup photo of ggd woman in the garden on a bright sunny day
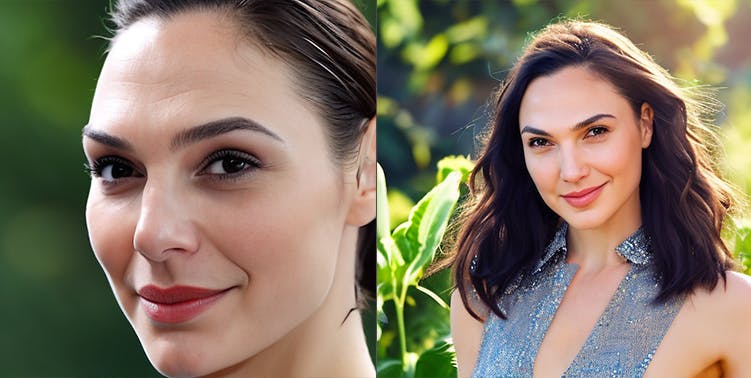
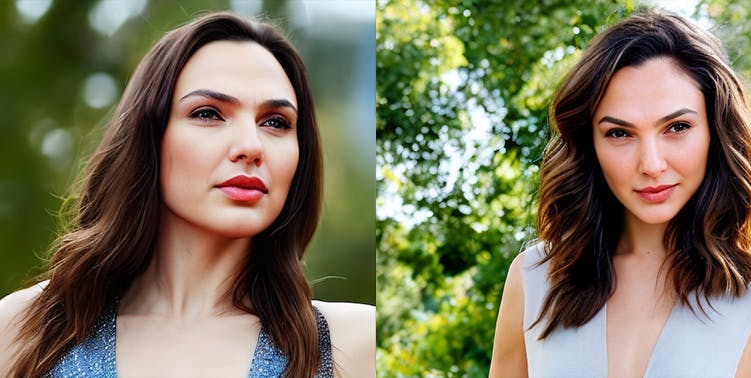
photo of ggd woman as superman
Note: If you see some issue with the content or you think something is updated when you read this at a later date, feel free to drop me a comment here or tweet at me on twitter ( twitter.com/DevDminGod )